Why Assembly Quality Matters
You have spent dozens of hours and hundreds of yards of yarn knitting the individual panels of a garment. Rushing through the finishing stage with bulky knots or uneven stitches can ruin the drape, cause side seams to twist around your body, and create pressure points that wear out prematurely.
Professional finishing is not about complex tailoring—it relies on just a few consistent geometric principles: matching stitch rungs, managing seam elasticity, and locking yarn tails securely.
A Norwegian version of this page is available on Strikketips.no
Pre-Seaming Preparation & Blocking
The single most common mistake in sweater assembly is attempting to sew curled, unblocked edges directly off the needles. Stockinette stitch naturally curls inward along vertical edges, obscuring the edge stitches and making even tension nearly impossible.
- Wet Blocking First: Soak your pieces in lukewarm water with gentle wool wash, press out excess water in a clean towel, and pin the pieces flat to the schematic dimensions given in your pattern.
- Straightening Edge Stitches: As you pin, align the selvedge edges so the horizontal running bars between the first and second stitches lie flat and visible.
- Let Dry Completely: Never sew damp wool; fiber elasticity while wet leads to sagging seams once dry.
Joining Shoulders: Strength vs. Invisible Drape
Shoulder seams bear the entire physical weight of a sweater. Choosing the right join prevents your neckline from stretching out of shape over time:
Three-Needle Bind-Off (Recommended for Structure)
Work with live stitches on both shoulder pieces. Holding right sides together, use a third needle to knit pairs of stitches together and bind off simultaneously. This creates a sturdy, self-stabilizing ridge on the inside that stops heavy cardigans and sweaters from dropping off the shoulder.
Kitchener Grafting (Invisible Seamless Join)
Used when you want a completely flat, weightless join with no internal ridge (ideal for lightweight lace shawls, fine fingering-weight garments, and sock toes). Thread a tapestry needle through live loops to duplicate a row of knit stitches across the seam.
The Magic Mattress Stitch (Vertical Seams)
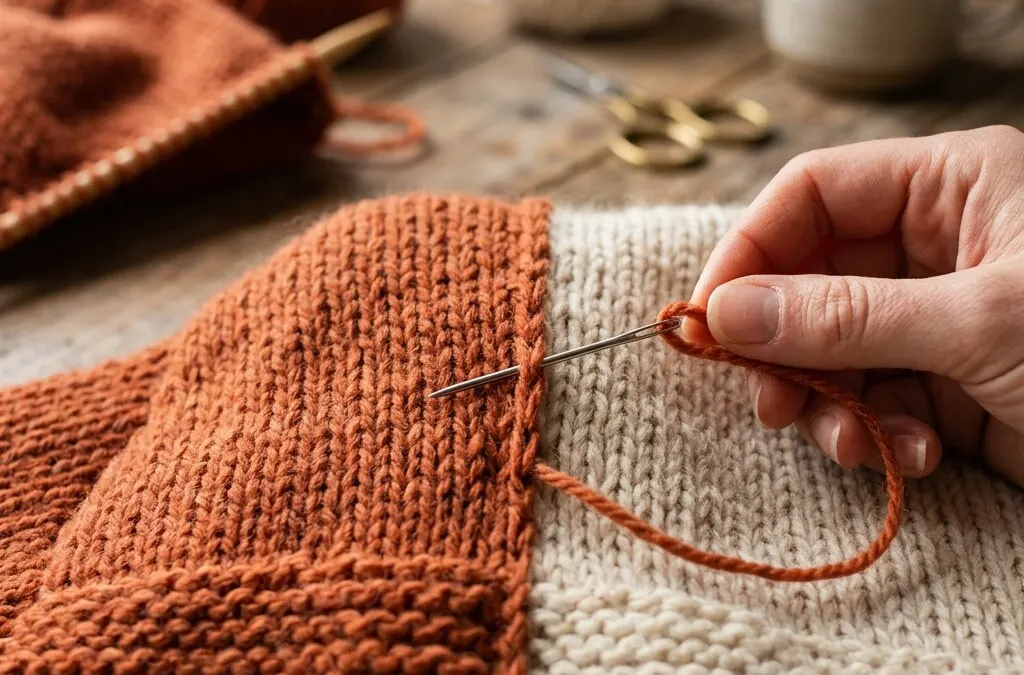
Mattress stitch is the gold standard for joining vertical side seams and sleeve seams. It is worked from the right side (RS) of the work, allowing you to monitor the pattern alignment and tension in real time.
Lay pieces flat
Place the two knitted pieces side-by-side with right sides facing up towards you.
Catch right horizontal bar
Locate the horizontal ladder rungs between the selvedge stitch and column 1. Insert needle under 1–2 bars.
Catch left horizontal bar
Cross over to the left piece at the same height and insert needle under the matching bar. Continue in a zigzag.
Pull yarn to close seam
Every 1–2 inches: Gently pull the working yarn. The edges pull together into a flawless, invisible seam.
Mattress stitch catches the horizontal ladder rungs in a zigzag sequence and pulls the seam seamlessly closed with a gentle tug.
Step-by-Step Mattress Stitch Instructions
- Lay your front and back panels flat, side by side, with right sides facing up.
- Anchor your seaming thread at the bottom hem, aligning the cast-on edges exactly.
- Locate the horizontal bars (rungs) running between the selvedge stitch and the first column of knit stitches.
- Insert your blunt tapestry needle under one bar (or two bars for speed on fine yarn) on the right panel, then bring it under the corresponding bar on the left panel.
- Work loosely for about 1–2 inches2.5–5 cm. You will see an open zigzag of thread between the panels.
- Gently pull the seaming yarn parallel to the seam. The two columns of knit stitches will pull together, tucking the seam allowances neatly to the inside.
Setting in Sleeves (Horizontal-to-Vertical Join)
Setting in a sleeve requires joining a horizontal edge (the bound-off sleeve cap or sleeve top) to a vertical edge (the row edges of the sweater body).
Because knitted stitches are wider than they are tall (a standard stitch gauge to row gauge ratio of approximately 3:4), sewing 1 stitch to 1 row will cause the sleeve to pucker. Instead:
- Pin the Key Anchor Points: Match the center of the sleeve cap to the shoulder seam, and the sleeve underarms to the body underarms using locking stitch markers or safety pins.
- Work the 3:4 Ratio: For every 3 bound-off stitches you catch along the sleeve edge, pick up 4 horizontal ladder rungs along the body edge.
- Ease Gradually: Distribute any slight fullness around the curve of the sleeve head rather than bunching it at the armpit.
Weaving in Ends Like a Professional
A tail woven in straight along a single row will pop out through the front fabric after a few trips through the washing machine. To secure ends invisibly and permanently:
- Zigzag Through Purl Bumps: On the wrong side (WS), weave your yarn tail diagonally through the purl bumps of several stitches, then double back in the opposite direction. The change in direction creates friction that locks the tail in place.
- Split-Ply Technique for Bulky Yarn: For chunky or super bulky yarns, un-twist the yarn tail into separate plies, weave each ply in a slightly different direction, and trim. This eliminates bulky lumps on the inside.
- Leave a Small Tail Until Washing: Snip the tail leaving about 0.5 in1 cm. After the garment's first final wash and blocking, the fibers will felt together slightly, and you can snip the remaining whisker flush.
Essential Finishing Toolkit
- Blunt Tapestry Needles Size 14–18 bent-tip needles glide under ladder rungs without piercing or splitting the spun yarn fibers.
- Locking Stitch Markers / T-Pins Crucial for anchoring matching stripe sequences, hem ribs, and sleeve caps before seaming.
- Smooth Seaming Yarn Leftover project yarn or a smooth sock yarn in a matching shade for fuzzy/textured yarns.
- Blocking Mats & Steam Iron Prepares and flattens edges so mattress stitch rows align cleanly stitch-for-stitch.
Frequently Asked Questions
Which yarn should I use for seaming?
Always use the same project yarn whenever possible so the seam has identical fiber behavior, stretch, and color. If the yarn is very thick, textured (like bouclé), or delicate (like single-ply roving), split the plies in half or use a smooth, strong wool yarn in a matching color and weight.
How tight should I pull the yarn when working mattress stitch?
Pull the seaming yarn just tight enough so the two edges kiss without overlapping or puckering. A reliable technique is to work loosely for 1–2 inches2.5–5 cm, then gently tug the working yarn until the seam closes smoothly, and finally stretch the seam lengthwise to seat the tension.
Why do my sleeve caps have more rows than the armhole opening?
Knitted stitches are wider than they are tall (often a 3:4 or 2:3 ratio). When joining a horizontal edge (bound-off stitches) to a vertical edge (row ends), you must ease the pieces together by picking up approximately 3 stitches for every 4 rows, rather than going stitch-for-row.
Should I block my pieces before or after seaming?
Block the individual pieces before seaming. Blocking relaxes the yarn, uncurls raw edges, and allows you to pin the pieces to exact pattern dimensions. Seaming flat, straight edges is significantly faster and prevents uneven twisting in the final garment.
How do I fix a seam if one panel is slightly longer than the other?
If the row counts are off by just a few rows, ease the excess fabric gradually: catch two horizontal rungs on the longer piece for every one rung on the shorter piece every few inches. Never bunch up the difference at the very end.